Nextcloud Configuration
This post shows how I configured my Nextcloud on my home server.
Ever since I started running my own Nextcloud instance about one and a half years ago I wanted to write a blog post about my setup. However up to now I have always delayed this for two main reasons. First I was never really confident that my setup was already in a state that could be presented and on the other hand time is always rare for me. However recently I have been asked on whether I have experience migrating a Nextcloud instance to docker. I do not have any migration experience since I directly started my Nextcloud journey using docker-compose, but I want to take this question as an opportunity to finally write this blog article.
As of writing this I still have not found a good backup solution except the Z-Raid in my server (which does not really count as a backup). So I am definitely not yet done with my setup.
Short disclaimer about what you can and cannot expect of this article:
- You CAN expect an article about how my setup is currently working and how to work around particular problems I experienced.
- You MAY NOT expect a step by step tutorial on how to setup Nextcloud. There are plenty out there already.
Although I try my best I cannot promise that I did not miss any configuration steps that I have done over the last one and a half years.
Also please note that I am constantly adapting my system and there are always updates and changes etc. Thus this configuration is for sure not 100% complete. However I decided to still publish the article because otherwise it probably might not get published at all, because Nextcloud will cease to exist before that date. So read it with a grain of salt and feel free to improve on the setup and publish your own insights.
The setup
My setup is built using docker-compose. This way the services are defined in yml files and can simple be started. For nextcloud there are 3 services necessary:
- a database
- nextcloud
- a server that runs php
For the database you can choose either MySql or Postgres. I chose MySql, but for no particular reason. For the server you can use either Apache or Nginx. I decided for Nginx as it’s said to have better performance. However you chan choose whatever fits you best.
A few quick words to the underlying basis and my general setup. I use Portainer for managing my docker setup. Unfortunately this limits me to docker-compose version 2 files, but so far this has not been a blocker for me. This is also the reason why I prefer having multiple containers over some Dockerfile hacking. If I have multiple containers I can simply have the whole config in a docker-compose.yml which allows me to maintain it using portainer rather than having to modify Dockerfiles and rebuild stuff over the commandline.
Don’t get me wrong. There is still plenty of stuff to configure in config files and on the commandline. Especially when getting started with Nextcloud in the first place. However I prefer it when I can do small day to day maintenance tasks over the UI rather than having to go through an ssh session.
-
create new folder
-
create docker-compose.yml in folder
-
create folders
mkdir -p /<path to your config data folder>/data/nextcloud/db/
mkdir -p /<path to your config data folder>/data/nextcloud/nextcloud
mkdir -p /<path to your config data folder>/data/nextcloud/cron/
Additionally you need some data storage folder where all the files you store in nextcloud will go. I will refer to this folder as /<path to your data storage folder>/nextcloud-data/ in this post.
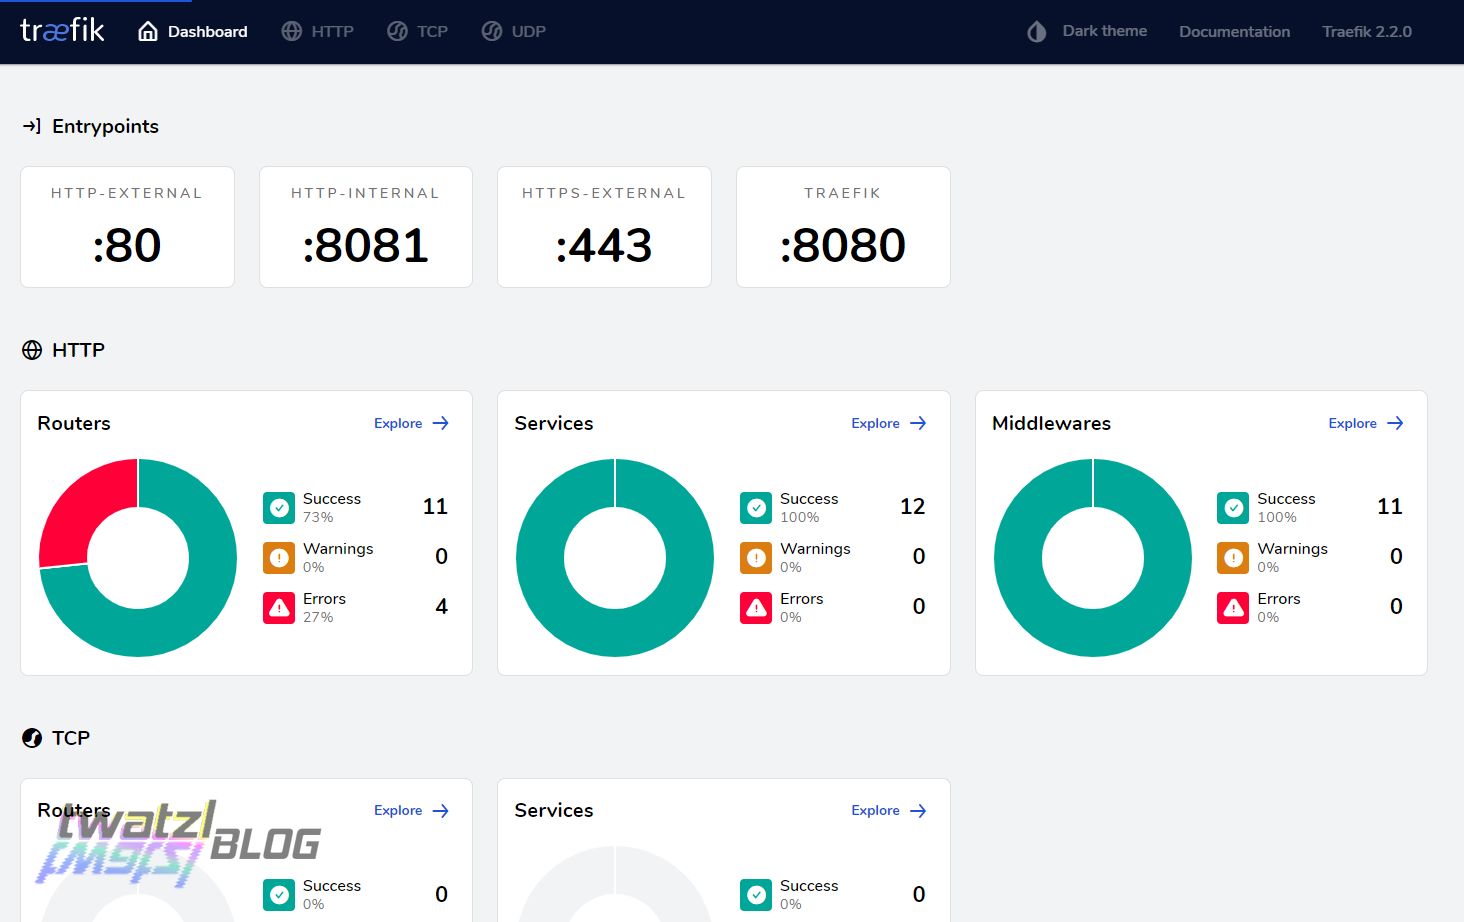
Traefik
For my setup I am using Traefik as a reverse proxy. You can see all the labels set in this post.
The advantage of using Traefik is that it can automatically take care of TLS certificates (with letsencrypt) and you can run multiple services on your server without having to care about how they are linked up.
I am talking about my Traefik configuration in a separate blog post.
If you do not want to use Traefik, but rather another reverse proxy or just bare Nextcloud, then just remove all the labels from the docker-compose.yml and remove the traefik-router network.
Because I use Traefik not just for Nextcloud, but for many services on my server I have put it in a separate stack. In order for Traefik to be able to communicate with Nextcloud you need to create an external network that can be used in both stacks. (or rather for every service that will route via Traefik)
$ docker network create traefik-router
To see details on how I have setup Traefik have a look at my other blog post.
My Traefik configuration for Nextcloud is based on this blog post.
Nextcloud with docker-compose
The following docker-compose.yml describes my Nextcloud setup.
Basically there are 5 services:
- app: the actual Nextcloud app, however since we use the fpm image we need some webserver
- web: an NGINX webserver that serves Nextcloud and runs the php scripts
- cron: another instance of Nextcloud that will run cron jobs (i.e. generating thumbnails)
- db: a mariadb instance for storing all nextcloud data
- redis: a redis database for storing lock information and caching
version: '2'

volumes:
  nextcloud-web:
    driver: local
    driver_opts:
      type: 'none'
      o: 'bind'
      device: '/<path to your config data folder>/data/nextcloud/nextcloud/'
  db:
    driver: local
    driver_opts:
      type: 'none'
      o: 'bind'
      device: '/<path to your config data folder>/data/nextcloud/db/'
  nextcloud-data:
    driver: local
    driver_opts:
      type: 'none'
      o: 'bind'
      device: '/<path to your data storage folder>/nextcloud-data/'
  nextcloud-cron:
    driver: local
    driver_opts:
      type: 'none'
      o: 'bind'
      device: '/<path to your config data folder>/data/nextcloud/cron/'

networks:
  nextcloud-internal:
    driver: bridge
  traefik-router:
    external:
      name: traefik-router

services:
  db:
    image: mariadb:latest
    command: --transaction-isolation=READ-COMMITTED --binlog-format=ROW
    restart: always
    volumes:
      - db:/var/lib/mysql
    networks:
      - nextcloud-internal
    environment:
      - MYSQL_ROOT_PASSWORD=to_be_replaced
      - MYSQL_PASSWORD=to_be_replaced
      - MYSQL_DATABASE=nextcloud
      - MYSQL_USER=nextcloud
  redis: # used for locking
    image: redis:alpine
    networks:
      - nextcloud-internal
  app:
    image: nextcloud:18.0.4-fpm-alpine
    links:
      - db
      - redis
    depends_on:
      - db
      - redis
    volumes:
      - nextcloud-web:/var/www/html
      - nextcloud-data:/data
    networks:
      - nextcloud-internal
    restart: always
  web:
    image: nginx:1.17.10-alpine
    # access is normallymuren done via Traefik
    # enable this port if you need direct access for debugging your setup
    #ports:
    #  - 8080:80
    links:
      - app
    volumes:
      - /<path to your data storage folder>/data/nginx-nextcloud/nginx.conf:/etc/nginx/nginx.conf:ro
    volumes_from:
      - app
    networks:
      - nextcloud-internal
      - traefik-router
    labels:
      - "traefik.enable=true"
      - "traefik.docker.network=traefik-router"
      - "traefik.http.middlewares.nextcloud-https.redirectscheme.scheme=https"
      - "traefik.http.routers.nextcloud-http.entrypoints=http-external"
      - "traefik.http.routers.nextcloud-http.rule=Host(`your.domain.here`)"
      - "traefik.http.routers.nextcloud-http.middlewares=nextcloud-https@docker"
      - "traefik.http.routers.nextcloud.entrypoints=https-external"
      - "traefik.http.routers.nextcloud.rule=Host(`your.domain.here`)"
      - "traefik.http.routers.nextcloud.tls=true"
      - "traefik.http.routers.nextcloud.tls.certresolver=letsencrypt"
      - "traefik.http.middlewares.nextcloud.compress=true"
      - "traefik.http.services.nextcloud.loadbalancer.server.port=80"
      - "traefik.http.middlewares.nextcloud-dav.replacepathregex.regex=^/.well-known/ca(l|rd)dav"
      - "traefik.http.middlewares.nextcloud-dav.replacepathregex.replacement=/remote.php/dav/"
      - "traefik.http.middlewares.nc-header.headers.referrerPolicy=no-referrer"
      - "traefik.http.middlewares.nc-header.headers.stsSeconds=31536000"
      - "traefik.http.middlewares.nc-header.headers.forceSTSHeader=true"
      - "traefik.http.middlewares.nc-header.headers.stsPreload=true"
      - "traefik.http.middlewares.nc-header.headers.stsIncludeSubdomains=true"
      - "traefik.http.middlewares.nc-header.headers.browserXssFilter=true"
      - "traefik.http.middlewares.nc-header.headers.customFrameOptionsValue=SAMEORIGIN"
      - "traefik.http.middlewares.nc-header.headers.customRequestHeaders.X-Forwarded-Proto=https"
      - "traefik.http.routers.nextcloud-secure.middlewares=nextcloud-dav,nc-header"
    restart: always
  cron:
    image: nextcloud:18.0.4-fpm-alpine
    restart: always
    links:
      - db
      - redis
    depends_on:
      - db
      - redis
    volumes:
      - nextcloud-cron:/etc/crontabs
      - nextcloud-web:/var/www/html
      - nextcloud-data:/data
    networks:
      - nextcloud-internal
    entrypoint: /cron.sh
Configuration
After the initial start there is some basic configuration, however I had to tweak some things. Especially the trusted domains, db user, db passwords and so on.
You can find all the important stuff in the official Nextcloud docs here.
nginx.conf
My nginx.conf is based on the official recommendation. These change from time to time, so make sure you check if everything is still up to date.
Note: If you use NGINX also as a reverse proxy (and therefore have 2 NGINX containers) you will also have 2 different nginx.conf configurations!
The following nginx.conf is located in the configuration directory of the Nextcloud NGINX service [Host:Container]:
/<path to your data storage folder>/data/nginx-nextcloud/nginx.conf:/etc/nginx/nginx.conf:ro
worker_processes  1;

error_log  /var/log/nginx/error.log warn;
pid        /var/run/nginx.pid;


events {
    worker_connections  1024;
}

http {
    include       /etc/nginx/mime.types;
    default_type  application/octet-stream;

    log_format  main  '$remote_addr - $remote_user [$time_local] "$request" '
                      '$status $body_bytes_sent "$http_referer" '
                      '"$http_user_agent" "$http_x_forwarded_for"';

    access_log  /var/log/nginx/access.log  main;

    #sendfile        on;
    #tcp_nopush     on;

    #keepalive_timeout  65;

    #gzip  on;

    upstream php-handler {
        server app:9000;
    }

    server {
        listen 80;

        # Add headers to serve security related headers
                # Before enabling Strict-Transport-Security headers please read into this
                # topic first.
                # add_header Strict-Transport-Security "max-age=15768000;
                # includeSubDomains; preload;";
                #
                # WARNING: Only add the preload option once you read about
                # the consequences in https://hstspreload.org/. This option
                # will add the domain to a hardcoded list that is shipped
                # in all major browsers and getting removed from this list
                # could take several months.
                add_header X-Content-Type-Options nosniff;
                add_header X-XSS-Protection "1; mode=block";
                add_header X-Robots-Tag none;
                add_header X-Download-Options noopen;
                add_header X-Permitted-Cross-Domain-Policies none;
                add_header Referrer-Policy no-referrer;

                root /var/www/html;

                location = /robots.txt {
                        allow all;
                        log_not_found off;
                        access_log off;
                }

                # The following 2 rules are only needed for the user_webfinger app.
                # Uncomment it if you're planning to use this app.
                #rewrite ^/.well-known/host-meta /public.php?service=host-meta last;
                #rewrite ^/.well-known/host-meta.json /public.php?service=host-meta-json
                # last;

                location = /.well-known/carddav {
                        return 301 $scheme://$host:$server_port/remote.php/dav;
                }
                location = /.well-known/caldav {
                        return 301 $scheme://$host:$server_port/remote.php/dav;
                }

                # set max upload size
                client_max_body_size 10G;
                fastcgi_buffers 64 4K;
                #fastcgi_request_buffering off;
                client_body_in_single_buffer on;
                client_body_temp_path /var/nginx_client_bodies;


                # Enable gzip but do not remove ETag headers
                gzip on;
                gzip_vary on;
                gzip_comp_level 4;
                gzip_min_length 256;
                gzip_proxied expired no-cache no-store private no_last_modified no_etag auth;
                gzip_types application/atom+xml application/javascript application/json application/ld+json application/manifest+json application/rss+xml application/vnd.geo+json application/vnd.ms-fontobject application/x-font-ttf application/x-web-app-manifest+json application/xhtml+xml application/xml font/opentype image/bmp image/svg+xml image/x-icon text/cache-manifest text/css text/plain text/vcard text/vnd.rim.location.xloc text/vtt text/x-component text/x-cross-domain-policy;

                # Uncomment if your server is build with the ngx_pagespeed module
                # This module is currently not supported.
                #pagespeed off;

                location / {
                        rewrite ^ /index.php;
                }

                location ~ ^\/(?:build|tests|config|lib|3rdparty|templates|data)\/ {
                        deny all;
                }
                location ~ ^\/(?:\.|autotest|occ|issue|indie|db_|console) {
                        deny all;
                }

                location ~ ^\/(?:index|remote|public|cron|core\/ajax\/update|status|ocs\/v[12]|updater\/.+|oc[ms]-provider\/.+|.+\/richdocumentscode\/proxy)\.php(?:$|\/) {
                        fastcgi_split_path_info ^(.+?\.php)(\/.*|)$;
                        set $path_info $fastcgi_path_info;
                        try_files $fastcgi_script_name =404;
                        include fastcgi_params;
                        fastcgi_param SCRIPT_FILENAME $document_root$fastcgi_script_name;
                        fastcgi_param PATH_INFO $path_info;
                        # fastcgi_param HTTPS on;
                        #Avoid sending the security headers twice
                        fastcgi_param modHeadersAvailable true;
                        fastcgi_param front_controller_active true;
                        fastcgi_pass php-handler;
                        fastcgi_intercept_errors on;
                        fastcgi_request_buffering off;
                }

                location ~ ^\/(?:updater|oc[ms]-provider)(?:$|\/) {
                        try_files $uri/ =404;
                        index index.php;
                }

                # Adding the cache control header for js, css and map files
                # Make sure it is BELOW the PHP block
                location ~ \.(?:css|js|woff2?|svg|gif|map)$ {
                        try_files $uri /index.php$request_uri;
                        add_header Cache-Control "public, max-age=15778463";
                        # Add headers to serve security related headers (It is intended to
                        # have those duplicated to the ones above)
                        # Before enabling Strict-Transport-Security headers please read into
                        # this topic first.
                        #add_header Strict-Transport-Security "max-age=15768000; includeSubDomains; preload;" always;
                        #
                        # WARNING: Only add the preload option once you read about
                        # the consequences in https://hstspreload.org/. This option
                        # will add the domain to a hardcoded list that is shipped
                        # in all major browsers and getting removed from this list
                        # could take several months.
                        add_header Referrer-Policy "no-referrer" always;
                        add_header X-Content-Type-Options "nosniff" always;
                        add_header X-Download-Options "noopen" always;
                        add_header X-Frame-Options "SAMEORIGIN" always;
                        add_header X-Permitted-Cross-Domain-Policies "none" always;
                        add_header X-Robots-Tag "none" always;
                        add_header X-XSS-Protection "1; mode=block" always;

                        # Optional: Don't log access to assets
                        access_log off;
                }

                location ~ \.(?:png|html|ttf|ico|jpg|jpeg|bcmap)$ {
                        try_files $uri /index.php$request_uri;
                        # Optional: Don't log access to other assets
                        access_log off;
                }
    }

}
config.php
The config.php file contains configuration values for Nextcloud itself. It will be auto generated, but I did some modifications.
It’s located at /<path to your config data folder>/data/nextcloud/nextcloud/config/
{
    "trusted_proxies": "***REMOVED SENSITIVE VALUE***",
    "memcache.local": "\\OC\\Memcache\\APCu",
    "filelocking.enabled": true,
    "apps_paths": [
        {
            "path": "\/var\/www\/html\/apps",
            "url": "\/apps",
            "writable": false
        },
        {
            "path": "\/var\/www\/html\/custom_apps",
            "url": "\/custom_apps",
            "writable": true
        }
    ],
    "instanceid": "***REMOVED SENSITIVE VALUE***",
    "passwordsalt": "***REMOVED SENSITIVE VALUE***",
    "secret": "***REMOVED SENSITIVE VALUE***",
    "trusted_domains": [
        "***ENTER YOUR DOMAIN HERE***",
    ],
    "datadirectory": "***REMOVED SENSITIVE VALUE***",
    "dbtype": "mysql",
    "version": "18.0.4.2",
    "overwrite.cli.url": "http:\/\/192.168.255.10:8080",
    "dbname": "***REMOVED SENSITIVE VALUE***",
    "dbhost": "***REMOVED SENSITIVE VALUE***",
    "dbport": "",
    "dbtableprefix": "oc_",
    "mysql.utf8mb4": true,
    "dbuser": "***REMOVED SENSITIVE VALUE***",
    "dbpassword": "***REMOVED SENSITIVE VALUE***",
    "installed": true,
    "maintenance": false,
    "overwriteprotocol": "https",
    "loglevel": 2,
    "memcache.distributed": "\\OC\\Memcache\\Redis",
    "memcache.locking": "\\OC\\Memcache\\Redis",
    "redis": {
        "host": "***REMOVED SENSITIVE VALUE***",
        "port": 6379
    },
    "updater.secret": "***REMOVED SENSITIVE VALUE***",
    "theme": "",
    "has_rebuilt_cache": true
}
.user.ini
.user.ini is another configuration file for Nextcloud. The values here are very important especially for bigger file uploads.
So far I have not added it as a volume, although this would be the more correct way. Here is my current configuration. In order to change it you have to edit it within the container using docker exec.
mbstring.func_overload=0
always_populate_raw_post_data=-1
default_charset='UTF-8'
output_buffering=0
upload_tmp_dir = /var/big_temp_file/
upload_max_filesize=10G
post_max_size=10G
memory_limit=1024M
Reverse Proxy
I recently switched from using Nginx as reverse proxy to Traefik as reverse proxy. There are several reasons for this:
- Nginx requires configuration outside of docker-compose file.
- This configuration has to be changed each time a new service is made available.
- With Traefik the configuration for each service is done directly at the docker-compose stack it affects.
- Traefik is built to work together with docker.
- Nginx requires extra containers for working with letsencrypt. Traefik makes this a whole lot easier.
However Traefik also has it’s drawbacks as sometimes it is not really clear what happens or why something is not working. This is especially true in the context of Nextcloud where you have a complex system behind.
One example of this can be found in this thread I created where I thought the issue was with traefik, but through lots of debugging realized it was actually a misconfigured Nextcloud. You can find an entry in the Nextcloud community forum.
If you want to get information on the different options you can use as a reverse proxy you can have a look at this list in the official documentation.
Performance Tweaks
Redis
As you can see in my docker-compose.yml and config.php I configured my Nextcloud instance to use Redis for caching and locking. According to the Nextcloud documentation this brings additional performance.
I do not remember anymore how much the performance really improved, however I know that I had some issues with orphaned locks before using Redis.
The important lines in config.php are the following:
    "memcache.distributed": "\\OC\\Memcache\\Redis",
    "memcache.locking": "\\OC\\Memcache\\Redis",
    "redis": {
        "host": "***REMOVED SENSITIVE VALUE***",
        "port": 6379
    },
I have not set a password for Redis. It is probably a good idea to do this, but since Redis is only reachable from within the stack it should not be a big deal.
If you are not sure if your Redis is configured correctly in this entry in the Nextcloud community you can find instructions on how to check.
Cron
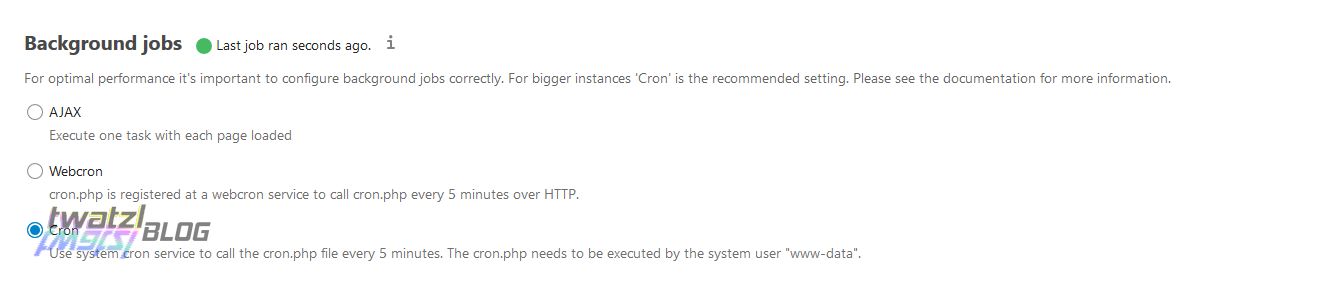
For several actions Nextcloud needs to regularly execute Cron jobs. There are different options for how to execute Cron jobs. These can be found when you log with an admin account and navigate to the settings page:
- AJAX: Basically whenever someone opens a page of Nextcloud, Nextcloud will execute a task.
- Webcron: Some PHP HTTP Cron Voodoo stuff.
- Cron: The real deal. A system cron service will execute the cron.php file every couple of minutes.
I noticed a significant performance improvement when switching this option from AJAX to Cron. AJAX might work for small Nextcloud instances, but not for the behemoth that I manage.
For this I am using a separate container which also runs the Nextcloud image and is configured like this:
  cron:
    image: nextcloud:18.0.4-fpm-alpine
    restart: always
    links:
      - db
      - redis
    depends_on:
      - db
      - redis
    volumes:
      - nextcloud-cron:/etc/crontabs
      - nextcloud-web:/var/www/html
      - nextcloud-data:/data
    networks:
      - nextcloud-internal
    entrypoint: /cron.sh
However I had a small config issue.
So you might get displayed a message like this:
crond: USER www-data pid   8 cmd php -f /var/www/html/cron.php
Your data directory is invalid
Ensure there is a file called ".ocdata" in the root of the data directory.
Cannot create "data" directory
This can usually be fixed by giving the webserver write access to the root directory. See https://docs.nextcloud.com/server/18/go.php?to=admin-dir_permissions
The documentation does not really state what the data directory is (or rather it get’s lost in the vastness of documentation), but really it is just the directory where all the files that are stored in Nextcloud are located.
So I was looking for an error in the docker configuration, but in reality I just configured config/config.php to point the data directory to /data in the container, so I had to reconfigure the cron container to be able to read and write that directory.
Basically the cron service has to use the same volumes and networks as the app service in the docker-compose.yml file.
Generating Thumbnails
Nextcloud supports generating thumbnails for images. This brings noticeable performance boost when opening folders with many images. (Of which I have many.)
However this comes at some cost for storage space. In my case the thumbnails for 4TB of data (~2TB of which are images) takes up about 480GB of space.
In order to auto generate the thumbnails I added the second line to the /etc/crontabs/www-data for the cron container. Again this was done using docker exec.
*/5 * * * * php -f /var/www/html/cron.php
0 0 * ? * * /var/www/html/occ preview:pre-generate
So far it seems to work ;)
Tipps and Tricks
ownCloud Client
Recently I discovered that the ownCloud Client works perfectly fine with Nextcloud. It seems Nextcloud did some mistakes when porting the ownCloud client, because the ownCloud client actually DOES parallel uploads and downloads (even on a Nextcloud server). This is especially noticeable if you want to sync many small files, like old digital images. Using the Nextcloud client to sync those files would have taken > 2 days (!), when I tried syncing the same files with the ownCloud client it was done in a couple of hours.
Looking in the Windows Task Manager reveals that the Nextcloud client is not using all available bandwidth, while ownCloud client uses pretty much 100% of it.
In general the ownCloud client seems to have a couple of nice features that the Nextcloud client is just lacking.
You can find a GitHub issue about slow sync here: https://github.com/nextcloud/desktop/issues/2125.
Kodi
Nextcloud cannot play a lot of video files. E.g. my Sony camera records .mkv files which cannot be played by Nextcloud. However Nextcloud provides a WebDAV endpoint (and basically the whole “cloud and sync” part is based on WebDAV). You can use the Kodi app which is available for many platforms and it allows you to browse WebDAV directories. That way you can watch movies or videos that are stored on your Nextcloud without having to sync them before. This is especially useful if you want to decide which videos to sync for video editing.
Apps
Apps are a pretty cool thing for Nextcloud. For example I use the decks app when I want to get lots of things done on a weekend. Another example would be the Cookbook app. With it I can note down my favorite recipies and even share them with my family and friends.
Also the installing process is super easy. Unfortunately you have to hope that the apps are continuously maintained for newer Nextcloud versions.
Updating
For an update you can simply increase the version referenced in the docker-compose.yml and restart the stack. If you want to be sure you can first log in to nextcloud with an admin account, run the interactive update (in order to run the nextcloud update scripts) and then bump the container version.
Note: As of now I am not mounting .user.ini, which means it will be overwritten when recreating the container. It has cost me quite some time to figure out what was wrong the last time I updated. 😅😁
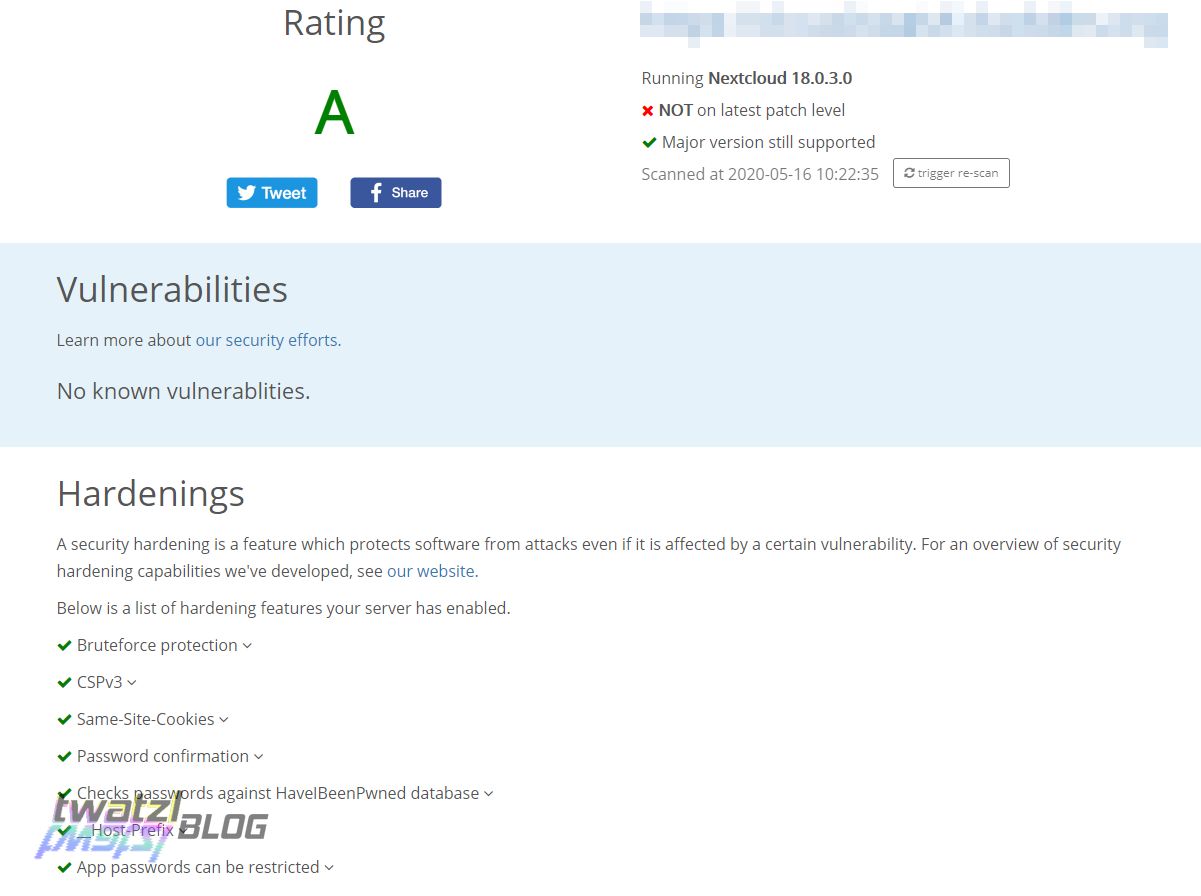
Security
Security is of utmost importance when your personal data is on the stake. Thus you want to make sure that everything is set up properly.
There are some tools to make sure your Nextcloud is configured correctly.
Note that while these tools are helpful they cannot detect every security issue with your setup, so be careful of what you configure.
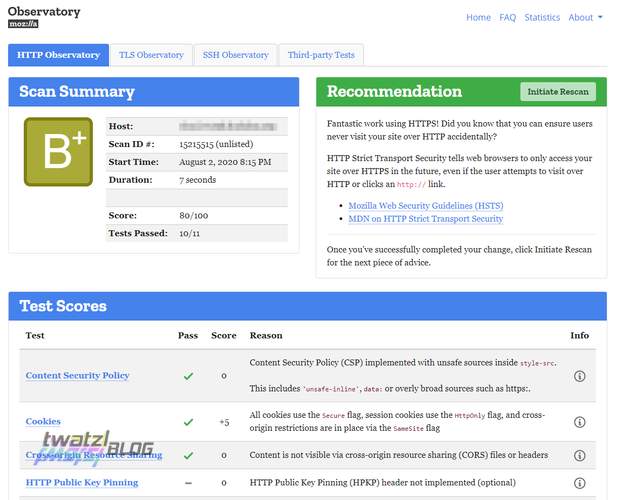
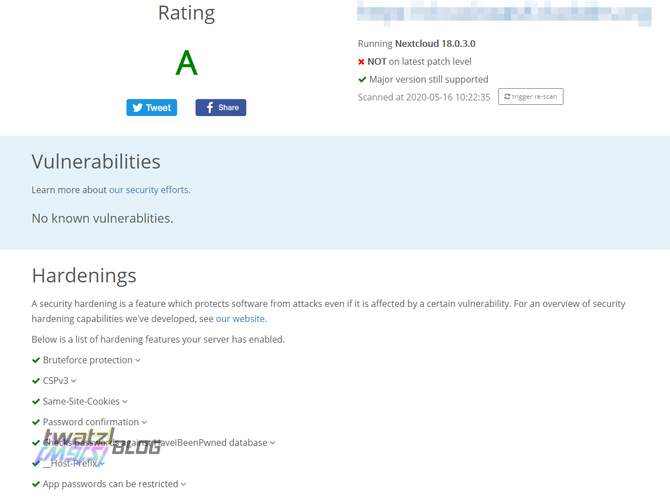
Also I am pretty sure that there are some more steps I would have to take to make my setup even more secure that do not show up in the observatory.
Learnings from my Experience with Nextcloud
From 1.5 years of use of Nextcloud I can tell you I love it and hate it at the same time.
I love it because it really allows me to upload images from anywhere. Whenever I am travelling around and taking photos I don’t have to worry about storage space. I have all images in a single place, have them all sorted, can access all my stuff from anywhere.
On the other hand I have it. Nextcloud has made me sweat for my data more than one time. Once I renamed a folder and my files were moved to the trash instead by Nextcloud. I could only recover them via the commandline, because the trashbin does not work once you have too much data in it.
Talking about not working. I noticed the web UI gets slower and slower when browsing directories online. You have to reload after each visited directory, because there seems to be some kind of memory leak. Additionally the UI seems to have some UX issues. For example when you select some files in a directory and scroll down the actions are only visible when you scroll up all the way to the top again.
Sometimes the Nextcloud server gets stuck as well. Maybe this is because my mariadb is configured improperly, or my server CPU is too weak or because of php. I can’t say why it happens, but well it’s annoying.
I already talked about the shortcomings of the client and there are a couple more Issues I posted on GitHub:
- Renaming in a synced folder leads to undetermined results and DELETED FILES!: https://github.com/nextcloud/desktop/issues/1296
- Nextcloud Client cannot handle unmounted folders on Windows.: https://github.com/nextcloud/desktop/issues/1368
- webdav reports wrong disk capacity and usage: https://github.com/nextcloud/server/issues/16077
- Trashbin does not open when too many files are deleted: https://github.com/nextcloud/server/issues/21600
Some of these issues are now over one year old and still are flagged with “needs triage” it seems that introducing new features is more important to the Nextcloud team than fixing bugs that may cause you to loose data. 🤷♂️ Not a single one of the issues I posted got any attention of the Nextcloud team.
If it only were an open source project this would be kind of understandable, however Nextcloud is also offered to companies for a fee and as a company this would not be acceptable for me.
Personal Opinion
Nextcloud is bad, but currently the best thing you get.
In the long term I have some hope in ownCloud moving to a golang backend implementation (see https://github.com/nextcloud/server/issues/16726 and https://www.cloudcomputing-insider.de/warum-owncloud-seine-architektur-ersetzt-a-826148/). From my experience go programs are super stable and hardly have any bugs once the initial bugfixing is done. Even in case some configuration is wrong go programs usually give a nice error message suggesting how the issue could be fixed instead of undebuggable error messages without a clear root cause.
Backup
tl;dr: I don’t have one (yet).
Backing up 4TB of data is quite a challenge. My Nexcloud server is now running for about 1.5 years. Right now I am working on finally freeing up my old NAS so I can put 2 8TB hard disk in it and run a cron job which will copy the configuration and data of Nextcloud.
Once I have done this I will write another blog post about the setup.
In the long term I plan to place another NAS, which I already bought, at someone else’s place in order to ensure a backup even in the case my flat goes up in flames.
References
Of course I did not come up with all of this information myself, but used the documentation of Nextcloud as well as blog posts of other people to collect everything together.
I have kept a list of useful links I encountered while setting up and managing Nextcloud and will include it here for you.
Official Documentation
How to move the Nextcloud data directory (where all the files are stored) after installation
How to access Nextcloud via WebDAV.
How to access Nextcloud WebDAV on Windows
Official docker-compose example
NGINX config
Although I have replaced my NGINX config, this might be some useful resources if you want to run Nextcloud with NGINX as reverse proxy.
Nextcloud Documentation: Nginx configuration

